Rapid Prototyping: Process, Benefits, Costs, and Applications
Rapid prototyping helps businesses turn product ideas into physical models that can be tested and improved before manufacturing begins. Instead of relying only on drawings or digital designs, engineers and designers can examine a real object, identify problems, and make changes early in the development process.
Today, rapid prototyping using 3D printing is useful in product development, automotive engineering, consumer products, and industrial design. It allows teams to explore design options, check component fit, and evaluate whether a product meets its intended requirements.
In this guide, we explain the rapid prototyping process, its benefits, common methods, materials, applications, and cost factors to help you choose the right approach for your project.
What Is Rapid Prototyping?
Rapid prototyping is a product development process used to create physical models or working prototypes from digital designs in a relatively short time.
These prototypes help designers and engineers evaluate a product before committing to full-scale manufacturing. Depending on the project, a prototype may be a simple visual model, a component for checking assembly or a functional part created for specific tests.
For example, a company developing a new electronic device may create a prototype enclosure to check its dimensions, button placement, and internal component fit before finalising the design.
The main purpose of rapid prototyping is simple: test ideas early, identify potential problems, and improve the design before production.
How Does the Rapid Prototyping Process Work?
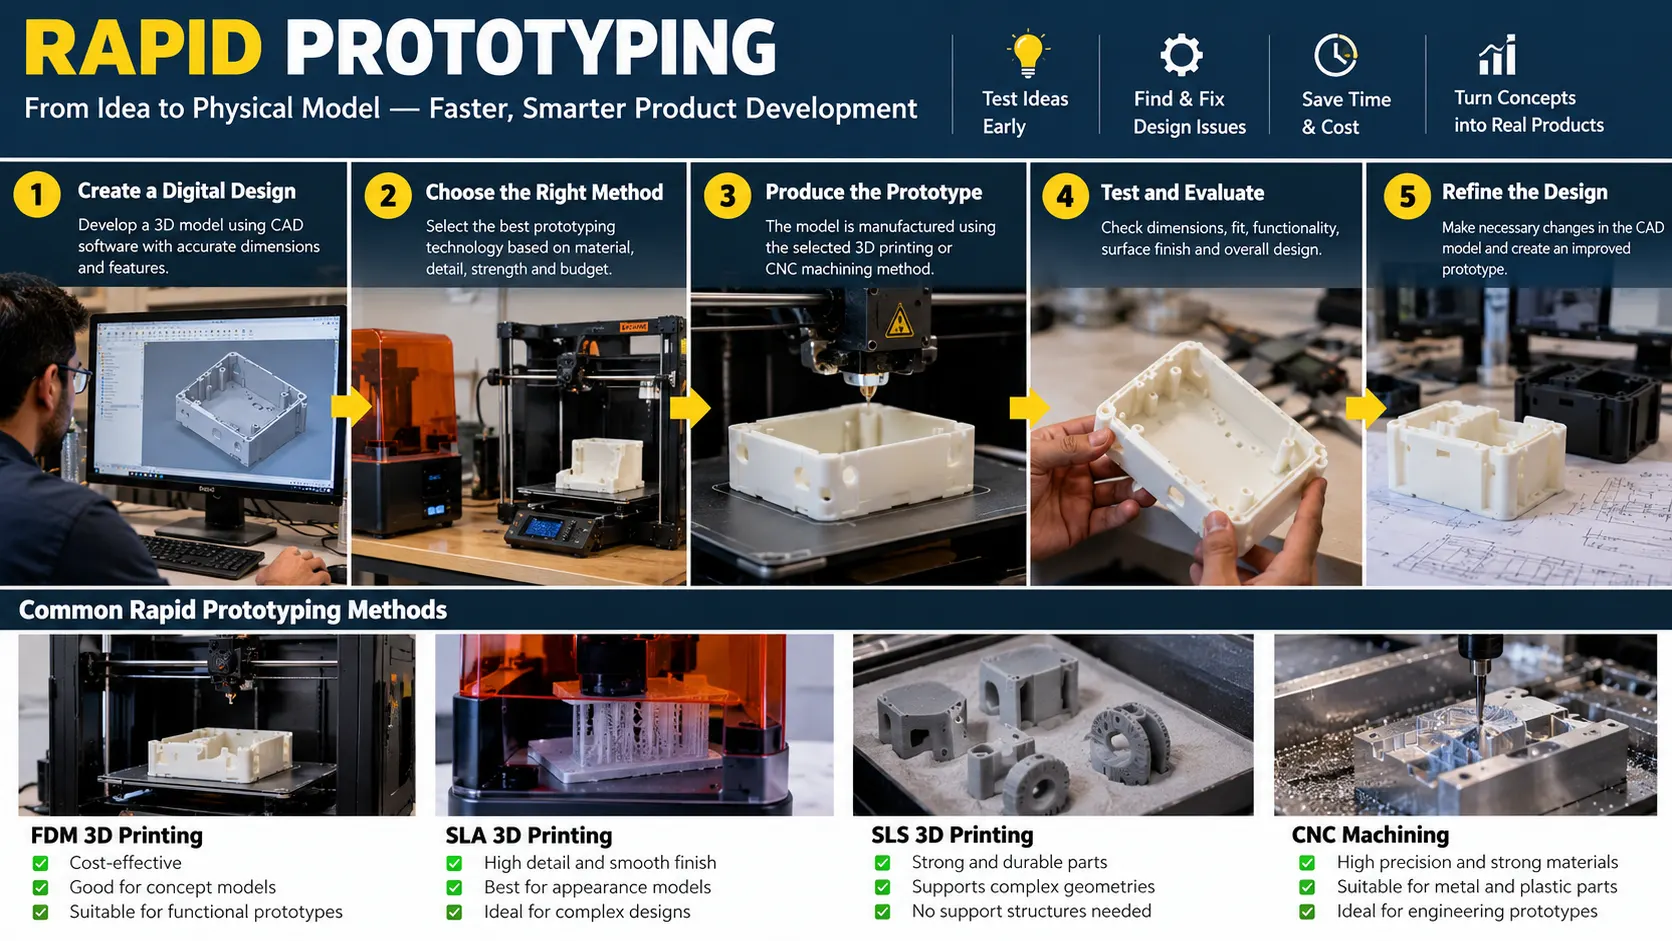
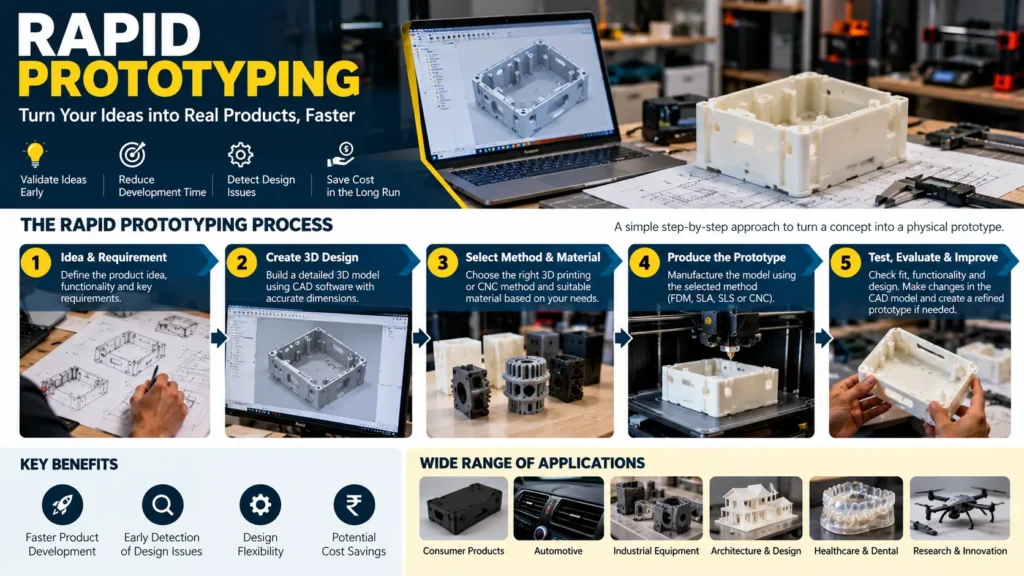
The rapid prototyping process typically involves five steps. The exact workflow depends on the product, selected manufacturing method, and testing requirements.
1. Create a Digital Design
The process usually begins with a computer-aided design (CAD) model. It defines the product’s shape, dimensions, and important features.
A well-prepared CAD model helps the team review the design before creating a physical prototype. If the design is intended for 3D printing, the model must also be prepared according to the requirements of the selected printer and process.
2. Choose the Right Prototyping Method
The next step is selecting a suitable production method. Common options include FDM, SLA, SLS, and CNC machining.
The choice depends on several factors:
- Design complexity: Does the part have intricate details or internal features?
- Material requirements: Does it need to be rigid, flexible, heat-resistant, or lightweight?
- Surface finish: Is the prototype mainly for visual evaluation or functional testing?
- Dimensional requirements: How accurately must the part fit with other components?
- Budget and timeline: How much time and money are available for the prototype?
Selecting the right method helps balance cost, quality, and project requirements.
3. Produce the Prototype
Once the design and production method are selected, the physical prototype is manufactured.
In 3D printing, a prepared digital model guides the machine as it builds the part layer by layer. The production time depends on the part’s dimensions, geometry, material, and printing settings.
Some prototypes may also require support removal, cleaning, curing, sanding, or other finishing work.
4. Test and Evaluate the Design
The prototype is evaluated against the product’s intended purpose. Testing may include:
- Dimensions and fit: Does the part fit correctly with other components?
- Appearance: Does the shape and surface finish meet the design requirements?
- Functionality: Do buttons, connections, or moving parts work as intended?
- Usability: Is the product practical and comfortable to handle?
- Performance: Does the prototype meet the requirements of the planned test?
A visual model may only need an appearance and fit review. A functional prototype may require additional mechanical, thermal, or other application-specific testing.
A prototype should not automatically be treated as proof that a product is ready for commercial use. Its results are meaningful only for the properties and conditions that have actually been evaluated.
5. Refine the Design
Testing may reveal dimensional errors, assembly issues, or opportunities to improve the product.
The team can update the CAD model and produce a revised prototype. This cycle of designing, testing, and refining continues until the design meets the project’s objectives.
By identifying issues early, rapid prototyping can help reduce the risk of costly changes later in product development.
Key Benefits of Rapid Prototyping
Rapid prototyping offers several advantages for businesses developing new products or improving existing designs.
Faster Design Evaluation
Creating a physical model allows teams to evaluate ideas without completing every stage of the final manufacturing process first.
Depending on the design and production method, some prototypes can be produced within hours or days. Complex parts, specialised materials, and extensive finishing may require more time.
Early Detection of Design Problems
A digital model may look correct on screen but reveal problems when assembled or handled physically.
A prototype can help identify:
- Incorrect dimensions or component fit.
- Interference between moving parts.
- Difficult-to-access buttons or connections.
- Uncomfortable shapes or impractical designs.
- Features that need modification before production.
Finding these problems early gives the team an opportunity to correct them before investing in larger manufacturing runs.
Greater Design Flexibility
Rapid prototyping makes it easier to explore alternative shapes, dimensions, and features.
For example, a product designer may compare two enclosure shapes or test different handle sizes before deciding which design to develop further.
With suitable methods, these changes can be made without creating new conventional moulds for every design revision.
Better Communication and Feedback
Physical models help designers, engineers, clients, and other stakeholders understand a product more clearly.
A prototype makes it easier to discuss proportions, assembly, usability, and design details than relying on technical drawings alone. Feedback can then be used to guide the next design revision.
Potential Cost Savings
Rapid prototyping can help reduce the expense of late design changes and identify problems before manufacturing at scale.
However, cost savings are not guaranteed. Multiple design iterations, expensive materials, specialized equipment, and finishing requirements can increase the total project cost.
The value comes from choosing a suitable prototyping method and using the results to make better development decisions.
Common Rapid Prototyping Methods
Different rapid prototyping methods are suitable for different requirements. The best option depends on the type of part, material, level of detail, and intended testing.
1. FDM 3D Printing
Fused Deposition Modelling (FDM) creates parts by depositing melted thermoplastic filament layer by layer.
It is commonly used for concept models, enclosures, fixtures, product mock-ups, and general-purpose prototypes.
Best suited for basic design checks, larger concept models, and many functional prototypes where the selected material meets the requirements.
What to consider: Visible layer lines may affect the surface finish, and part strength can vary with print orientation and settings.
2. SLA 3D Printing
Stereolithography (SLA) uses light to cure liquid photopolymer resin into solid layers. It is often selected when fine details and a smooth surface finish are important.
SLA can be useful for product appearance models, detailed components, and selected jewelry or dental design workflows. The suitability of a part depends on the specific resin and intended application.
Best suited for: Detailed prototypes and intricate shapes and parts where surface quality is a priority.
What to consider: Resin properties vary. Some parts require washing, post-curing, and careful handling after printing.
Explore SLA 3D printing services in India to learn more about this technology.
3. SLS 3D Printing
Selective Laser Sintering (SLS) uses a laser to fuse powdered material, commonly polymer powder, into a solid part.
The surrounding powder supports the part during production, making SLS suitable for many complex geometries and designs that would otherwise require additional support structures.
Best suited for complex polymer parts, functional prototypes, and designs with intricate features when the selected material meets the requirements.
What to consider: Equipment availability, material selection, surface texture, and post-processing can affect the final result and cost.
4. CNC Machining
Computer Numerical Control (CNC) machining uses computer-controlled cutting tools to remove material from a solid block.
Unlike 3D printing, which generally builds objects layer by layer, CNC machining produces parts by cutting away material. It can be useful when a prototype needs particular material properties, machined surfaces, or dimensional accuracy.
Best suited for: Selected metal and plastic prototypes, precision components, and parts that need to be made from specific stock materials.
What to consider: Complex internal shapes and certain geometries may be difficult or expensive to machine.
Which Rapid Prototyping Method Should You Choose?
| Method | Main advantage | Suitable applications |
| FDM 3D printing | Practical for many general-purpose models | Concept models, enclosures, and basic fit checks |
| SLA 3D printing | Fine details and smooth surface finish | Appearance models and detailed components |
| SLS 3D printing | Supports complex polymer geometries | Selected functional prototypes and intricate parts |
| CNC machining | Works with suitable solid stock materials | Precision components and selected engineering prototypes |
These are general guidelines, not fixed rules. Material properties, design requirements, and testing conditions should determine the final choice.
Materials Used in Rapid Prototyping
Material selection affects a prototype’s strength, appearance, flexibility, temperature resistance, and cost.
Common materials include:
- PLA: Often used for concept models, visual prototypes, and basic fit checks. It is easy to print but may not suit applications involving high temperatures or demanding mechanical loads.
- ABS: Can be useful for functional prototypes requiring toughness and better heat resistance than standard PLA, depending on the material grade and manufacturing conditions.
- PETG: Offers a useful balance of toughness, flexibility, and printability for many general-purpose prototypes.
- Flexible TPU: Suitable for selected designs that require flexibility, such as grips, flexible covers, and certain cushioning components.
- Photopolymer resins: Used in SLA printing for detailed models and particular surface-finish requirements. Strength, flexibility, and heat resistance vary by resin.
- Engineering polymers and metals: May be appropriate for more demanding applications when the material and production process meet the required performance specifications.
The best material depends on what you want to learn from the prototype. A model created to check appearance may have different requirements from a component intended for mechanical testing.
Applications of Rapid Prototyping
Rapid prototyping is used across industries where teams need to evaluate product designs before committing to full production.
Product Design and Development
Businesses can create physical versions of new products to check their appearance, dimensions, usability, and component fit.
This approach is useful for consumer electronics, household products, accessories, and many other product categories. It also helps teams gather feedback before finalizing the design.
Automotive Industry
Automotive designers and engineers may use prototypes to evaluate interior components, housings, brackets, design concepts, and selected functional parts.
These models can support early-stage design validation and help teams identify fit or assembly issues. However, parts intended for actual vehicle use require appropriate engineering validation and safety testing.
Industrial Equipment and Engineering
Manufacturers can prototype machine components, custom fixtures, equipment housings, and specialized parts.
Physical models help teams review dimensions, assembly, accessibility, and design practicality before making manufacturing decisions.
Architecture and Interior Design
Architects and designers can use physical models to communicate layouts, shapes, and design concepts.
A physical model can help clients understand proportions, spatial relationships, and design details that may be difficult to visualize from drawings alone.
Healthcare and Dental Applications
3D printing can support the development of anatomical models, dental design workflows, and selected medical product prototypes.
The manufacturing process, material, and intended use must be considered carefully. A general-purpose prototype should not be assumed to be suitable for clinical use, and regulated applications may require additional validation and compliance.
Illustrative Example: From Product Idea to Prototype
Consider a business developing a new plastic enclosure for an electronic device. Before ordering a large production batch, the team wants to confirm that the enclosure fits the internal components and provides convenient access to its buttons and ports.
The team could follow this process:
- Create the CAD model: Define the enclosure’s dimensions, openings, and mounting points.
- Choose a prototyping method: Select a suitable 3D-printing technology based on the required detail, material properties, and budget.
- Print the enclosure: Produce a physical model for initial inspection.
- Check fit and usability: Test the component placement, button access, and assembly.
- Revise the design: Correct any interference or dimensional issues and produce another version if needed.
This is an illustrative example, not a documented Paradise 3D customer project. It demonstrates how rapid prototyping can help a team evaluate a design before moving to production.
How Much Does Rapid Prototyping Cost?
The cost of rapid prototyping varies according to the project. A small, simple plastic model may cost less than a large, detailed part that requires specialized materials, precision work, and extensive finishing.
The following factors commonly affect the final price:
| Cost factor | How it affects the price |
| Part size | Larger parts generally require more material and machine time. |
| Design complexity | Detailed geometry and challenging features may increase production time. |
| Material selection | Different plastics, resins, and metals have different costs and properties. |
| Production method | FDM, SLA, SLS, and CNC machining have different equipment and processing requirements. |
| Quantity | The number of parts can affect setup costs and the average cost per part. |
| Finishing | Sanding, polishing, painting, assembly, and other post-processing add work. |
| Design revisions | Additional prototype versions can increase the overall project cost. |
| Delivery timeline | Urgent scheduling may affect production arrangements and pricing. |
How to Get an Accurate Rapid Prototyping Quote
To help a provider estimate your project, share the following details:
- CAD file or design: Provide the digital model if available, or a clear description of the part.
- Dimensions and quantity: Specify the approximate size and number of prototypes required.
- Material requirements: Mention your preferred material or explain what the part needs to withstand.
- Intended purpose: Clarify whether the prototype is for appearance, fit checks, assembly, or functional testing.
- Surface finish and tolerances: Identify any important dimensional or finishing requirements.
- Expected timeline: Explain when you need the prototype.
A provider can review these details, recommend a suitable production method, and prepare a more informed quotation.
The cheapest option is not always the most appropriate. A prototype intended for functional testing may require different materials and production methods from one created only to demonstrate appearance.
Rapid Prototyping vs 3D Printing: What Is the Difference?
Rapid prototyping describes the process of creating and evaluating product models to improve a design.
3D printing, also known as additive manufacturing, is a production method that creates objects by adding material, usually in layers, from digital models.
3D printing is widely used for rapid prototyping because it can produce complex shapes and support design changes without conventional molds. However, rapid prototyping can also involve CNC machining and other manufacturing methods.
The right approach depends on the prototype’s purpose, material requirements, complexity, and budget.
Frequently Asked Questions About Rapid Prototyping
1. What is rapid prototyping used for?
Rapid prototyping is used to test product designs, evaluate dimensions, check component fit, gather feedback, and identify potential problems before manufacturing begins.
2. How long does rapid prototyping take?
Some simple prototypes can be produced within hours, while larger or more complex projects may take several days or longer. Design preparation, material availability, production time, finishing, and testing all affect the timeline.
3. Which materials are used for rapid prototyping?
Common materials include PLA, ABS, PETG, flexible TPU, photopolymer resins, and selected engineering plastics or metals. The right material depends on the prototype’s purpose and required properties.
4. Is 3D printing suitable for rapid prototyping?
Yes 3D printing is useful for many prototypes because it supports complex shapes, design revisions, and the production of individual parts without conventional molds. However, CNC machining or another process may be more suitable for certain materials or applications.
5. What factors affect rapid prototyping cost?
Part size, design complexity, material, production method, quantity, finishing, and delivery requirements all influence the cost. Sharing a CAD file and clear project requirements can help a provider prepare a more accurate quotation.
6. What is the difference between rapid prototyping and mass production?
Rapid prototyping focuses on testing and improving a design. Mass production focuses on manufacturing larger quantities efficiently and consistently. A prototype may need several revisions before the design is ready for large-scale manufacturing.
7. Can rapid prototyping be used for functional testing?
Yes, depending on the selected method, material, and test requirements. However, prototype may not reproduce every property of the final manufactured product. The part must be evaluated for the specific performance requirements being tested.
Conclusion
Rapid prototyping helps businesses turn ideas into physical models, evaluate designs, and identify potential problems before moving into manufacturing. By testing products early, teams can make better decisions about dimensions, materials, usability, and design improvements.
The most suitable method depends on the project’s goals. FDM can work well for many general-purpose models, SLA is useful when fine details and surface finish matter, and SLS or CNC machining may be appropriate for specific engineering requirements.
A well-planned prototyping process can help teams learn from each design iteration and move towards a more refined product with greater confidence.
Need a Prototype for Your Next Product?
Planning a new product or need to evaluate a design before manufacturing? Paradise 3D can help you explore available 3D-printing options for your project requirements.
Share your design, dimensions, preferred material, and intended application to discuss a suitable approach.
Explore our 3D printing solutions or learn more about our SLA 3D printing services in India to explore the available options.